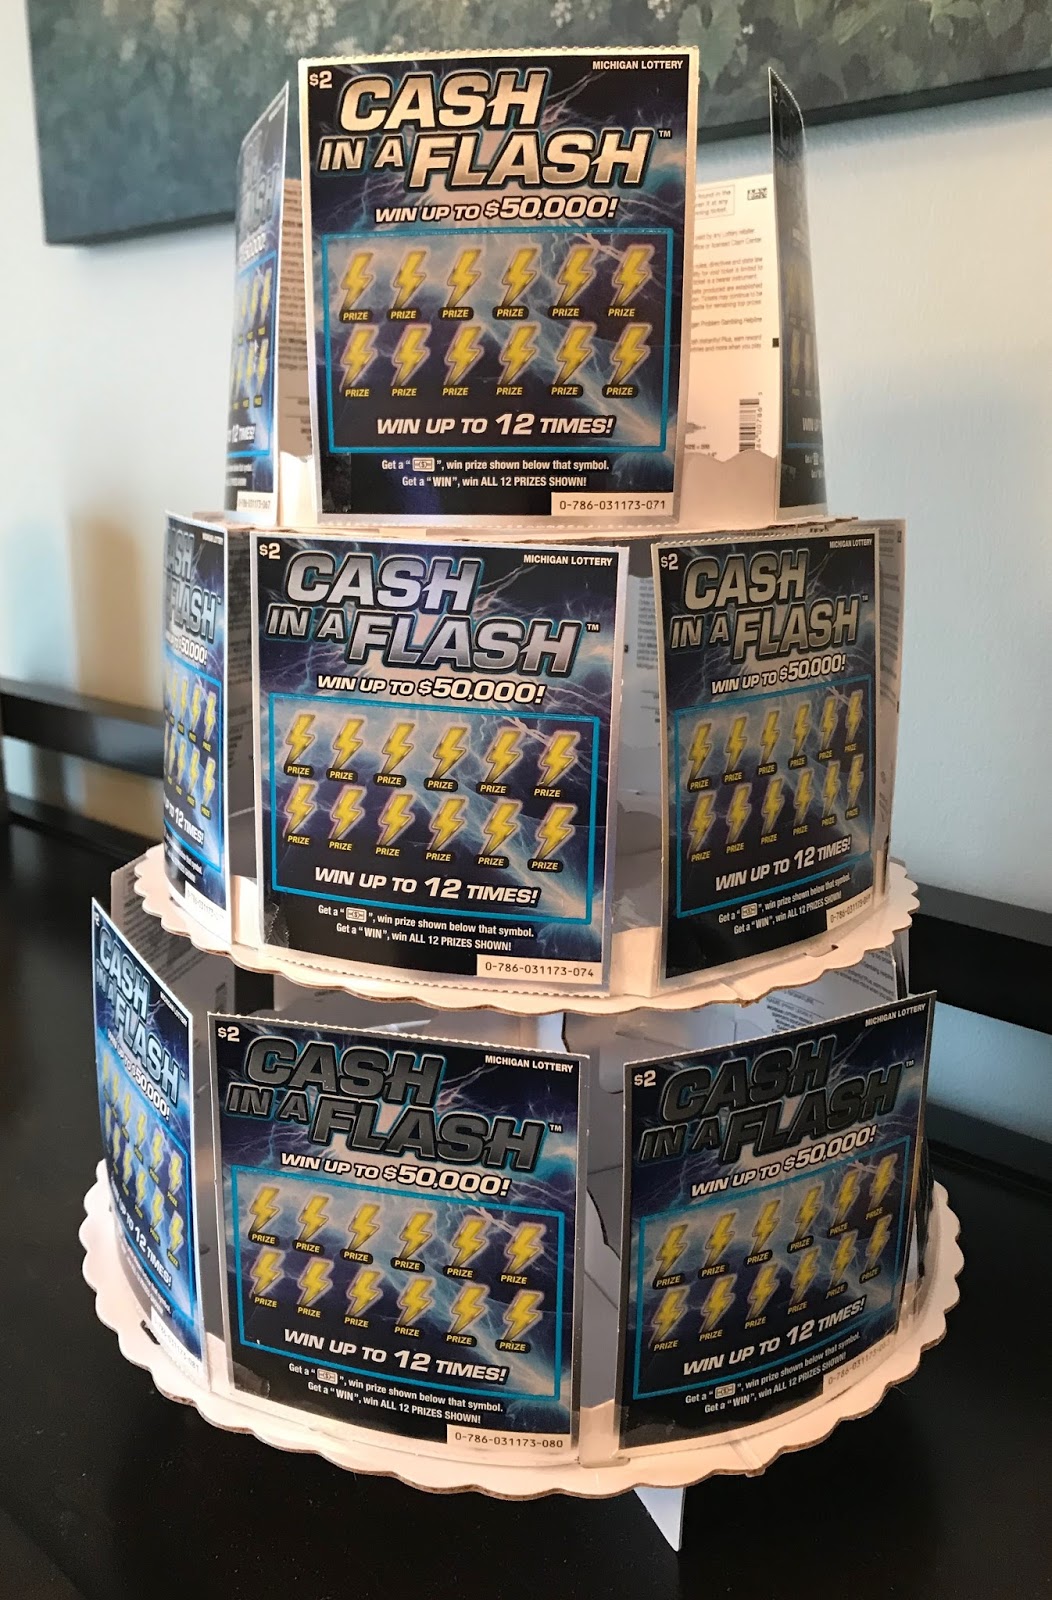
Wednesday, April 10, 2013

Paper, Scissors, Chevrons


Thanks for stopping by my blog today.  I've been working on a special tutorial for Splitcoast Stampers and it's finally LIVE.

The tutorial is for making chevrons using a paper trimmer, scoring tool (or trimmer with bone folder) and scissors.  A few months back I wanted to make a card with chevrons and I didn't have a die or embossing folderAfter a few hours and many failed attempts I figured out a way to use the tools I already had to create a chevron shapeYou can find my Splitcoast tutorial HERE - including a really cool video of me making the chevronsI was unable to get a hand double for this video - it's all me.

My chevron tutorial uses strips of paper that are 1 inch wide by 5 1/2 inches long.  For today's card, I took my original dimensions and reduced the width to 3/4 inch and the length to 4 1/4 inch.

FINALLY - here is the card I have to share today......


Supplies -
Stamps:  Hero Arts Everyday Sayings
Paper: Baja Breeze, Naturals White
Ink: Chocolate Chip
Accessories:  Blossom Party Die, Dazzling Diamonds
  
This week's challenge at Cas-ual Fridays is to make a card using Chevrons and Flowers so I'm also including this card in the challenge.  You can find the challenge HERE.


The Youtube Video is here:


Saturday, March 9, 2013

10 Minute Craft Dash #13

I've been so busy getting acclimated to my new job that my craft time has really suffered.  I decided the best way to get some crafting done was to play along in the 10 Minute Craft Dash

Here's the challenge:  It's  a color challenge.


I thought these colors would be good for a masculine birthday card. Here it is....


It's clean and simple without a lot of fuss and I got it finished in 8 minutes and 5 seconds.

Thanks for stopping by and checking out my card today!

Thursday, January 17, 2013

Follow Your Dreams....

These past few weeks I've been wrapping things up at work because next week I'm starting a NEW JOB!!!  I got the offer right before Christmas so it's been in the works for almost a month now.  This new job is an amazing opportunity and I'm really really excited.  It will be a BIG change but I'm ready for it!

So today's card is for ME!  YEP, I made myself a card....


Supplies
Stamps:  None - Sentiment generated in MS Word 
Paper:  Basic Black, PTI White, Glittery White
Accessories:  Circle and Star Punches

Okay, I also made this card for the current CAS-ual Fridays Challenge (to make a card that celebrates an accomplishment, and feature at least one circle).  I think this new job fits the accomplishment theme perfectly and you can see I have included 4 circles.

So, here's to me Following My Dreams.....CHEERS!

Thanks for stopping by and checking out my card!  You can find the CAS-ual Fridays challenge here:

CFC85


Tuesday, January 1, 2013

2012 Year in Review

Happy New Year!

In January 2012 I took the CAS card class and really focused on making cards that were much more clean and simpleI have really had to focus on balance and design more than ever in my attempt to grow as a cardmaker with a CAS focus.  It's been so much fun following blogs and becoming friends with some very talented card makers this year.  I can't wait to see what 2013 will bring. 

Here are my 10 favorite cards from 2012 in no particular order.


I have one more card to share with you from 2012.  Interestingly this last card is my most pinned card on Pinterest and it really isn't even one of my ten favorites but apparently there are a lot of people that really like it.


I hope you had a wonderful holiday seasonThanks for stopping by and checking out my favorite cards from 2012. 

Saturday, December 22, 2012

Merry Christmas Tree

It's only a few days before Christmas and I finally found some time to make a card.  This card is for two challenges.  The CAS-ual Fridays challenge is combined with the 10 Minute Craft Dash Challenge.  The theme is a CAS Holiday card in less than 10 minutes.  Well it's a miracle but I did it, and with 1 minute and 17 seconds to spare.


I had an idea to make a Christmas Tree out of the Scalloped Circle Punch and Word Window punch from Stampin Up. For the Tree I punched out one scalloped circle and cut three scallops into a triangle for the top, 4 scallops for the middle and 5 scallops for the bottom.  I used the word window punch for the tree trunk.  I used foam dots to adhere the tree above the sentiment.  I punched the star out and popped it on top.  Then I added the rhinestones.

Here's my stop watch:


Thanks for stopping by and checking out my card.

Here are the links to the challenges:

CD #9

CFC83