Saturday, December 31, 2011

Happy New Year - January Calendar Page

Happy New Year 2012!!!

Today I'm sharing my calendar page for January 2012. 


I created this calendar page using My Digital Studio (MDS) from Stampin Up.  I used Night of Navy for the background and Very Vanilla and Not Quite Navy for my accent colors.  The SNOW border is a new digital download.  I just learned that there is actually a quick calendar insert you can use in MDS that will let you select the month and year and then format the font for your calendar page.  Last month I spent a long time formatting the calendar using a text box.  This time it was much easier.  If you happen to have MDS the insert for calendar is on the right toolbar under stamps.

A few of my blogging friends are also doing calendar pages.  Check out these blogs for more great calendar inspiration.....

Lisa http://kindcreations.blogspot.com/

I've been using my digital calendars for my desktop wallpaper.  That's why there is a large blank space on the left side of the page.  I leave that blank for desktop icons.  Not to say that there is anything wrong with blank space.  I really like the balance of this calendar page.

If you would like to use my January calendar page for your desktop wallpaper here's how:

1.  Double click on the picture to open.
2.  Right click on the open picture.
3.  Select set as desktop background.

If you try to set this picture as desktop wallpaper and have trouble with distortion send me an email and I can reformat the picture to fit your screen size.

Thanks for stopping by and checking out my January calendar page!  

I wish you and your family a very
Happy, Healthy and Blessed New Year!

Julie

Friday, December 30, 2011

My 2011 Top 10 Crafty Creations


Today I'm sharing my top 10 favorite projects from 2011.  If you want to create a top 10 ten list for 2011 you can link it to Kellie Winnell's blog  HERE.

I hope you're enjoying the last couple days of 2011.  Honestly, I'm really looking forward to 2012 and a fresh NEW Year!!!  Looking back on my projects from 2011 was fun.  Here are my favorites:

First card I ever sewed on
Love the fun colors on this one.

Gift set I made for my Twin Sister
Teacher Gifts, Magnetic Clothes Pins

Love this Easel Card

Totally Adorable Turtle
Advent Calendar Muffin Tin with Chocolates behind each day
The most ribbons I have ever put on one card!


Adorable Halloween card - Love the layout of this one.


Love the colors and layout of this super cool Rockin' Frawg card!

Thanks for stopping by and checking out my favorite projects from 2011!  If you want to play along, just link your favorites to Kellie's blog  HERE!

Sunday, December 25, 2011

Snowflake Christmas


Merry Christmas!!!!  

This is the Christmas card that I sent out to my friends and family this year.  I always say I'm going to start making my cards in the summer and then I never do.  This year was no exception.  I didn't even start making them until this past Tuesday.  I made 50 of them in 2 days.  That has to be some kind of a record for me.  I mailed them out on December 22nd.  Hopefully most of them will arrive in time for Christmas.  I think next year I will try for a more Clean and Simple design.  Even though this card doesn't look too fancy there were a lot of layers.  The sentiment is heat embossed in sliver embossing powder.  The snowflakes are punched from a Sizzix Snowflake die using a white paper with silver specks.  On the inside I printed out Wishing you a Merry Christmas and a Happy New Year.  I used MS Word to format the sentiment on the inside.  I also signed it from Scott, Emily and myself.  That saved me from having to hand write our signatures on 50 cards.  It's not as personal but I think that the handmade card makes up for the fact that I didn't personally sign it.

Side View


Thank you for stopping by and checking out my 2011 Christmas Card!


Pin It

Friday, December 23, 2011

It's a BOY!!! Welcome Baby Dreux!!!


Today I'm sharing this adorable It's a BOY card!  One of my very best friends and her husband just had a little boy before Thanksgiving and this is the card I made for them.  I made the boat from scraps of retired SU Designer Paper.  For the bottom of the boat I just punched 3/4 of a circle leaving the straight edge.  For the sails I made two triangles from a square and then trimmed one shorter than the other.  I cut free hand the flag at the top.  The boat shape itself was inspired by the boat in the Stampin Up set Nursery Necessities.  The It's a boy sentiment was printed from SU My Digital Studio.  I love the Chocolate Chip Bakers Twine!  It makes a perfect accent to the nautical theme of this card.


Thanks for stopping by and checking out my baby boy card!  I'll be back on Sunday with my 2011 Christmas Card!


Pin It


Monday, December 19, 2011

SPARKLE Challenge!!


This week's Totally Stampalicious challenge is to add SPARKLE to your creation!  I used red glitter paper and stickles for my sparkle.  The red glitter paper is from Stampin Up.  I ended up having to use sticky tape to get the green striped layer to stick to the sparkle paper.  The image is Deacon and Ava HoHo from the Totally Stampalicious Bugaboo Line. 

Thanks for stopping by and checking out my Sparkle card!!!

Pin It

Monday, December 12, 2011

Eat, Drink, and Be Merry with GUS


This week's challenge at Totally Stampalicious is to have some food or drink on your card or project.  I chose to use Going to Town Gus from the Totally Stampalicious Bugaboo line for this challenge.  I went with a really clean and simple layout for this one.  I colored the image with my Sharpie markers - except the skin tone which is SU Blush Blossom.  I think this sentiment is perfect for Gus!

Thanks for stopping by and checking out my card!  
I hope you get a chance to play along in our Food or Drink challenge this week!


Pin It


Saturday, December 10, 2011

Blue Winter Bird Snowman Card for VSN


Happy Saturday Friends!  Today I'm sharing a card I made for one of the VSN (virtual stamp night) challenges going on at Splitcoast Stampers.  The theme of the challenge is to create a BLUE card and they want you to do it in 45 minutes or less.  I used the Winterbird Snowman stamp set from the Totally Stampalicious Bugaboo line for the image.  I kept the design really simple.  Isn't that DP GORGEOUS!!!  I LOVE this paper!!!  The scallop edge is the back of the blue background so it's one piece of DP.  To create the blue snowflakes I sponged white glittery snowflakes with blue ink.  I also sponged blue ink around the image to soften it up a bit.


Thanks for stopping by and checking out my BLUE Winter Bird Snowman card.  Now I have to go back to the scrapbook store to see if I can get some more of that gorgeous paper!  Have a GREAT weekend!!!!


Pin It

Mini Muffin Tin Advent Calendar

Close up of the calendar

This past week was my Stampin Up card club's Christmas party.  Every year we have a gift exchange at the party.  This year I made this Advent Calendar.  The pictures are not the greatest.  I was very last minute putting this calendar together.  I made it on Wednesday night and the party was on Thursday night.

The little squares are attached to a mini muffin pan with magnets.  Behind each square is a treat (Dove Peppermint Chocolate).  After I took this picture, my Husband drilled two holes in the top of the tray and I put some white taffeta ribbon through the holes to make a hanger.  Unfortunately I didn't get a picture of the calendar with the ribbon. 

I used MS Word to create the numbers.  The dp is retired SU designer paper that I had been "saving".

Thanks for stopping by and checking out my Advent Calendar!

Pin It

Monday, December 5, 2011

White Christmas Challenge


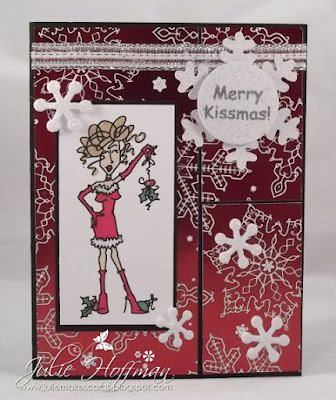
 This week's challenge at Totally Stampalicious is an easy peasy one - we want you to have some SNOW on your creations!  I inked up Scarlette Mistletoe for this challenge!  The DP I used is shiny metallic red with white snowflakes.  I added a few more snowflakes and ribbon to finish it off.


We're still running our Totally Stampalicious Dessert Menu Sale:

Stampalicious Dessert Menu
Level 1 - Vanilla Ice Cream - Buy 5 Get 1 Free
Level 2 - Strawberry Shortcake - Buy 8 Get 2 Free
Level 3 - Triple Layer Chocolate Cake - Buy 11 Get 3 Free

Thanks for stopping by and checking out my card today!  You can see more great samples for this week's SNOW challenge at the Totally Stampalicious Blog


Pin It

Wednesday, November 30, 2011

December Calendar Page and a Digital Desktop Wallpaper

WOW....It's December 1st Already!    I really have no idea where November went!  Today I'm sharing my December calendar pageS.  Yep, this month I actually made two calendar pages.  The first page is this adorable hanging calendar.......


I used the adorable Deacon Elf stamp from the Totally Stampalicious Bugaboo Line for the image.  I printed the calendar and the month and year out on Kraft Cardstock.  I colored the image with Stampin Up markers and then masked and sponged the image to soften it up.  It was too white against the pretty patterned paper.  The layout is very clean and simple.

My second calendar page is DIGITAL!


I made these pages using My Digital Studio from Stampin Up.  I'm using the blue and brown version right now as my desktop wallpaper for December.  If you right click on either of the pictures you should be able to save it as your desktop wallpaper too!  I kept the calendars and the snowflakes to the right of the page so they wouldn't be covered up by my desktop icons.  I'd love to hear your feedback on my desktop wallpaper.  It's definitely a crafting work in progress and this is my first attempt at it.


Be sure to stop by and check out these other FABULOUS Calendar Pages that my super talented blogging friends created!!


Thanks for stopping by and checking out my December Calendar pages!  


Monday, November 28, 2011

Non-Traditional Christmas Colors challenge

It's time for another FUN challenge at Totally Stampalicious!  This week's challenge is to use non-traditional Christmas colors.  I chose pink and green.  Poppi's hat is even colored to match the paper. I used the Poppi Cocoa stamp set for the image and the sentiment.  This was a really fun challenge!  I hope you get a chance to play along with us this week!

Check out the Totally Stampalcious Blog to see some more great non-traditional Christmas colors inspiration!

Don't forget about the AWESOME promotion going on NOW at Totally Stampalicious!!!

Stampalicious Dessert Menu
Level 1 - Vanilla Ice Cream - Buy 5 Get 1 Free
Level 2 - Strawberry Shortcake - Buy 8 Get 2 Free
Level 3 - Triple Layer Chocolate Cake - Buy 11 Get 3 Free
 

Thanks for stopping by and checking out my card today!


Thursday, November 24, 2011

Totally Stampalicious Black Friday Sale!!!!!


Thanksgiving 2011 is almost over.  We had a wonderful celebration with our family.  I made this quick card with one of my personal favorite stamp sets....Dottie Desserts.  Behind my card is the gluten free bumpy cake we had for dessert today.  I've been Gluten Free for 2 years now and the holiday's are extra challenging for me because I have to make sure all my food is safe.  Today I brought my own turkey, stuffing, and gravy and a salad and bumpy cake to share.  It was a lot of work preparing the entire meal but it turned out to be delicious.  I have a lot to be thankful for this year!

Speaking of things to be Thankful for.......Totally Stampalicious is having a
  

Black Friday Sale!

We are having an AWESOME BLACK FRIDAY SALE!!!

 
You can now SAVE 25% off your ENTIRE purchase at
Totally Stampalicious!!!
This INCREDIBLE SALE is only on for 24 Hours so head on over to
Totally Stampalicious Now!!
Use Coupon Code
BLACKFRIDAY25 

Coupon can not be combined with any other offer.
 
Thanks for stopping by and checking out my card!  I hope you had a Blessed and Happy Thanksgiving if you're reading this from the USA.

Monday, November 21, 2011

Mixing it up with Margaret


This week's challenge is super easy and FUN.  We want you to mix it up and use stamps from two different stamp sets.  I combined the image from Margaret December with the sentiment from  Scarlette MistletoeMargaret is being so sassy!  

I used this week's Splitcoast Challenge Sketch SC359 for the layout.  I love this sketch!  For the snowflakes I used a combination of my Sizzix Snowflake die and some metallic snowflakes.  The white background paper is covered in silver specks.  I stamped the sentiment with versamark and embossed it with silver embossing powder.  I had a hard time getting a good picture of the sentiment.  It reads - You'll Find Me Under the Mistletoe!


Check out the Totally Stampalicious Blog for more great inspiration on our Mix it Up challenge! 


 Totally Stampalicious! is running a great promotion:  

Stampalicious Dessert Menu
Level 1 - Vanilla Ice Cream - Buy 5 Get 1 Free
Level 2 - Strawberry Shortcake - Buy 8 Get 2 Free
Level 3 - Triple Layer Chocolate Cake - Buy 11 Get 3 Free
Thanks for stopping by and checking out my Mix it Up card!  I hope you get a chance to play along with us this week.

Sunday, November 13, 2011

3D Challenge Gift Tag

This week's challenge at Totally Stampalicious is to create a 3D item.  I made this quick and easy gift tag using the new Deacon & Ava HoHo stamp.  I colored the image with my sharpie markers and a white souflee puffy pen.  The snowflakes are foam sparkly stickers.  I used the round tab punch and an eyelet for the tab.  I attached the tab and then threaded the ribbon through the tab.  I highly recommend you thread the ribbon before you secure the tab if you use this layout.  It wasn't easy to get the ribbon through the tab once it was secured on the gift tag.


This is the perfect time to start working on those holiday gift items.  I always come up with some great idea on December 22nd and have to rush to put together my crafty gift at the last minute.  That is not going to happen this year!  I already have this wine tag so I have one down!  I hope you get a chance to play along with our 3D challenge this week!


Want some more great 3D inspiration?  Check out the Totally Stampalcious Blog to see what our design team has put together to inspire you today!


Totally Stampalicious! is running a great promotion:  

Stampalicious Dessert Menu
Level 1 - Vanilla Ice Cream - Buy 5 Get 1 Free
Level 2 - Strawberry Shortcake - Buy 8 Get 2 Free
Level 3 - Triple Layer Chocolate Cake - Buy 11 Get 3 Free


Thanks for stopping by and checking out my Gift Tag today!  I hope you get a chance to play along with our 3D challenge this week!


Monday, November 7, 2011

Anything Goes with Gus


It's time for this week's Totally Stampalicious Challenge!  This one is super easy....Anything Goes!!!!  I chose to use the new Going to Town Gus!  He is so funny!  I know a few people that will absolutely LOVE this card!  For the layout I used this week's Sketch Saturday Sketch #180.  I rotated the sketch to work with Gus!

Be sure to check out the Totally Stampalicious Blog for more great inspiration from our Awesome Design Team!

Thanks for stopping by and checking out my card today!  I hope you get a chance to play along with us this week!


Sketch Saturday Sketch #180


Monday, October 31, 2011

November Calendar Page & a Free Template


Wow - it's November 1st already!  These months are just flying by!  It's already time for my November calendar page.  I created the actual calendar in Excel and resized it and printed it out in Word.  The entire calendar page is 6.5 x 6.5 inches.  

I'm trying something new....if you'd like to make a November calendar page using the template I created click HERE to download the PDF file.  Hopefully this link will work....fingers crossed!!!!  Be sure to let me know if you are able to create a page with my template!

The designer paper is from We R Memory Keepers (Autumn Splendor).  My base is Chocolate Chip cardstock.  I added a little More Mustard CS for the photo corners and the top border.  The flowers are also from We R Memory Keepers.  I figured it will be getting cold here soon so it's my last chance to use flowers on a calendar page for a while.


Every month a group of bloggers, including myself, post new calendar pages.  Be sure to check out these blogs for some awesome November calendar page inspiration. 


Thanks for stopping by and checking out my calendar page!
 

Halloween with Ava Fairy

Happy Halloween!!!!!!


This week's Totally Stampalicious challenge is to make a Halloween card or project!  I found this great Halloween designer paper from doodlebug design inc and knew it would be perfect with the adorable Ava Fairy.  Ava was stamped on Papertrey Inc white card stock and colored with Sharpies, except the skin tone which is blush blossom marker from Stampin Up.  Ava's hair is really brown but she's wearing a black wig to go with the rest of her costume he he.  I cut the image and clouds out freehand with my small fiskars scissors.  The spider webs and the BOO are heat embossed with white embossing powder.  I used this week's Sketch Saturday Sketch #179 for the layout.  I really like this sketch!!!


The  Totally Stampalicious Store is running a new PROMOTION called.........Let Us 'Treat' You Right!
It's designed to reward you for your AWESOME taste in stamps! 

Stamp sets are ALL $8.95 each now!


Stampalicious Dessert Menu
Level 1 - Vanilla Ice Cream - Buy 5 sets Get 1 Free
Level 2 - Strawberry Shortcake - Buy 8 sets Get 2 Free
Level 3 - Triple Layer Chocolate Cake - Buy 11 sets Get 3 Free


Thanks for stopping by and checking out my card today!  I hope you get a chance to play along with us in our Halloween challenge!!!!  Check out the Totally Stampalicious Blog for more Halloween Inspiration!


Monday, October 24, 2011

Take Notes Challenge


I'd like to start off by THANKING everyone that stopped by my blog for the New Release and Blog Hop last week!  The stamps being release this month are AWESOME and so much fun to work with!  I enjoyed reading all the comments and hopping through the blog hop!

It's Monday and that means we have a new Challenge at Totally Stampalicious!  This challenge is an EASY one.  We want you to make at least 3 note cards.  I like even numbers so I made 4.  These cards are 4 x 4.  I used Night of Navy card stock stamped with white snowflakes for the base.  The frames were made with Cranberry Crisp paper and the SU Scallop Trim Border and Corner punches.  The image is one of our new releases Winter Bird Snowman. I colored the images with a combination of Sharpie markers and Coloring Pencils.  I got a new snowflake die - Sizzix Snowflakes #15.  I cut the snowflakes out of some glittery white CS and added a rhinestone to the center for my embellishment.  Finally, I added some dazzling diamonds to make the snow sparkle.

Be sure to stop on over to the Totally Stampalicious Blog to see what other awesome Note Cards the Design Team has created!  I hope you get a chance to play along in our challenge this week!  These little cards are going to come in handy for the holidays!

Thanks for stopping by and checking out my card set today!

Thursday, October 20, 2011

Totally Stampalicious Christmas Release and Blog Hop

WELCOME!!

You have reached the 7th Stop of the Totally Stampalicious 

Christmas Release and Blog Hop!!!

We are so excited to share SEVEN NEW SETS with you all tonight and they are

AVAILABLE NOW at  TOTALLY STAMPALICIOUS!!

As always we have some FABULOUS PRIZES to give away including:

1st Prize - All 7 New Sets

2nd Prize - $15 Gift Certficate

3rd Prize - $5 Gift Certificate

All you have to do is Hop along with us and leave your comments along the way 
and maybe YOU could be a WINNER!!!!

I have 4 cards to share with you today!

HERE ARE MY SAMPLES FOR THE CHRISTMAS RELEASE!!!!!

Scarlette Mistletoe
 Margaret December

Deacon Elf
Poppi Cocoa
 All of these releases are from the Totally Stampalicious Bugaboo Line by amazing artist Jodie Mackerell!

They are ALL must-haves for this year's Holiday Cards!!!

Now it's time to hop on over to Jessie's Blog to see what Awesome Christmas Inspiration she has for us!

And here is the entire Blog Hop Line Up in case there are any glitches along the way!


Monday, October 17, 2011

Witchy Stella for Color Challenge


Supplies:
Stamps:  Road Trip Stella, Michaels Halloween Stamp Set
Paper:  Basic Black, Peach Parfait, Concord Crush, PTI White
Ink: Momento Black, Sharpie Markers, Blush Blossom SU Marker
Accessories:  Black Sheer Ribbon, Scalloped Circle Punch, 1 1/4 & 1 3/8 Circle Punches, White Gel Pen, Scalloped Edge Punch
 
This week's challenge at Totally Stampalicious is a color challenge.  We want you to use Orange, Purple, and Black.  I decided to get Road Trip Stella ready for Halloween!  I used Sharpies to color the image, with the exception of the skin tone, for that I used the Blush Blossom Marker from Stampin' Up.  The Hat and Sentiment are from an old Haloween stamp set.  The witch hat is just the right size for Stella - LOL.  I masked the image and sponged the background with momento black ink.  I also sponged some black on the sentiment.

Thanks for stopping by and checking out my card today!  Check out the Totally Stampalicious BLOG for more great color inspiration!

I hope you get a chance to play along in our color challenge this week!  We're having a New Release and Blog Hop on Thursday!!!!  Can't wait to show you some of our awesome new releases!!!!

Monday, October 10, 2011

Thankful for You, Mom

Supplies:
Stamps:  Chester Platypus, Digital Sentiment
Paper:  Cajun Craze CS, We R Memory Keepers Autumn Splendor DP, PTI White CS
Ink:  Prisma Color Pencils, Versa Magic Wheat Chalk
Accessories: Paper Flower Kit (We R Memory Keepers), SU Scallop Oval Punch, SU Oval Punch, SU Scallop Trim Corner Punch, SU Scallop Trim Border Punch


Happy Thanksgiving to all my Canadian friends and bloggers!  This week's challenge at Totally Stampalicious is to create a Thanksgiving or Thank You card.  I used the adorable Chester Platypus stamp from the Sylvia Zet line at Totally Stampalicious for my image.  The sentiment is a digital stamp.  Isn't that DP gorgeous?  I fell in love with it and just had to have it.  It goes perfectly with the Cajun Craze SU cardstock too!

I made the scalloped square frame using my Stampin Up punches.  It took me a good while (and some math) to figure out the right measurements to make that frame.  In case you have those punches and would like the measurements...I cut a square at 3 and 6/16 on my Fisker's Trimmer. I punched all 4 corners with the corner punch and then went back with my edge punch and lined up the scallops from the corner with the scallops on the punch.  The brown scallop edge was part of the DP I used.  It came with four scalloped edges.  I just trimmed it to fit the DP square.

What am I Thankful for?  I am Thankful for my Mom.  She's recovering from surgery in Arizona while I'm at home in Michigan - missing her tremendously.  I'm thankful that her surgery went well and that I was able to be there with her for a few days last week.  This recovery is not easy or quick but she's determined to work hard and get better.  She's been constantly on my mind and in my prayers.

Thanks for checking out my Thanksgiving card today!  I hope you get a chance to play along in our challenge this week!